Do you wish to extend your swimming season during extremely cold or hot weather?
Or, are you bored of constantly cleaning your pool?
If your answer is yes, then this is the perfect guide for you.
Why?
This ultimate guide covers everything you need to know when building your own pool enclosure.
First, I will show you how to choose a suitable material and design for pool enclosure.
Then, I will outline a step by step process of installing the pool enclosure.
Before that, let us know what we mean by a pool enclosure.
What is a Swimming Pool Enclosure?
It is a structure such as a wall, door or gates, which surround your swimming pool.
Otherwise, we can simply define it as a structure surrounding a swimming pool.
Both definitions will describe the same equipment-swimming pool enclosure.
What’s more?
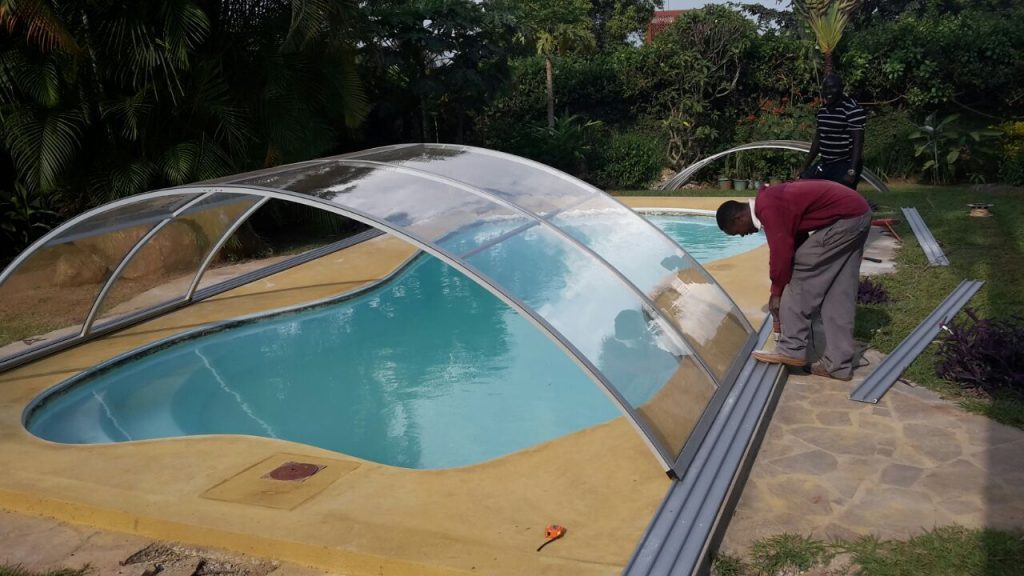
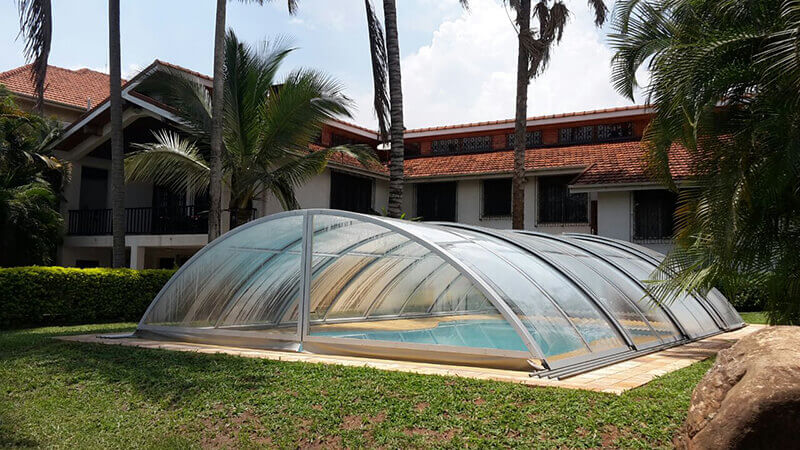
Unlike the swimming pool covers or swimming pool fences, enclosures form kind of a “shelter or house” to the pool.
I know you’re wondering how?
It covers the pool, while leaving a reasonable space above the water surface.
Depending on the design and structure, you can swim even when the pool is closed.
Look at this:
However, this is not enough to describe the importance of a swimming pool enclosure.
The different types of enclosures may either be used to transform your outdoor swimming pool to an indoor swimming pool or, to provide your pool with a super fancy cover.
But those two are not enough, a swimming pool enclosure comes along with a variety of benefits which I will explain to you in a moment.
Benefits of Building your own Pool Enclosure
Below are some of the main reasons why you need a pool enclosure for your outdoor pools:
§ For protection and privacy
You want to make sure that your pool is not only safe from accidents but also offers proper privacy from outsiders.
Tinted swimming pool enclosure
The pool enclosure prevents outsiders from observing your pool activities as well as accessing your pool without authorization.
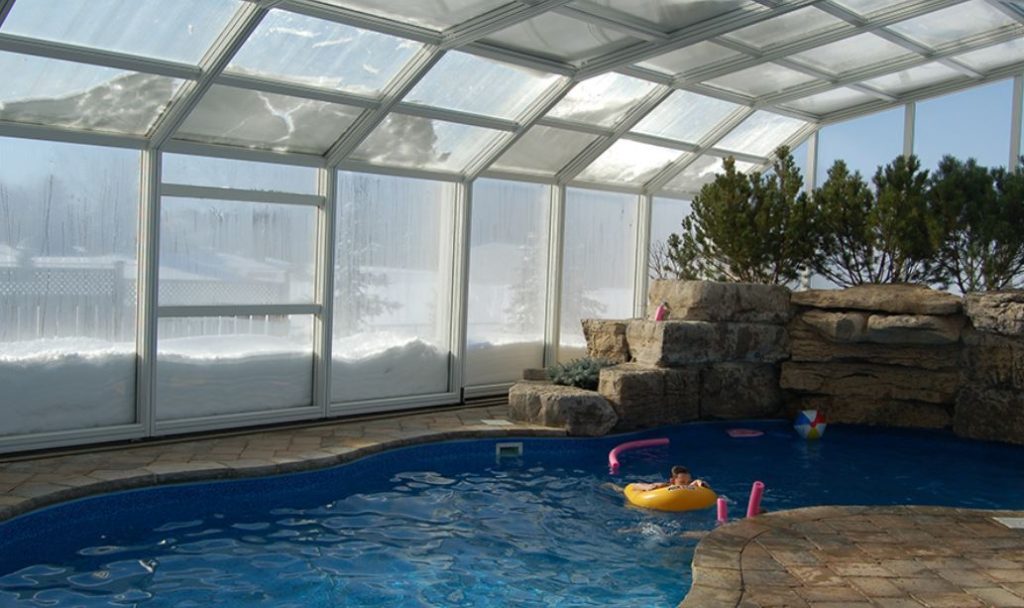
§ Extending swimming session
Ideally, most of the pool enclosures will heat up your pool as well as enable you to transform your pool to an indoor one.
Kids swimming in a pool
This in turn extends your swimming sessions year through by providing protection from harsh weather conditions.
§ Cost effective
A pool enclosure will reduce the amount of water evaporation at the same time maintaining cleanliness in the pool.

Water evaporating from a pool – Photo credit: Pool Center
This in turn makes you save on water costs, maintenance costs and chemical costs.
§ Increases property value
Investing in it will not only ensure safety, but also increase value for your pool and property.

Pool enclosure increases property value
§ Reduce amount of debris entering the pool
It covers your pool otherwise cutting down the amount of debris entering into the pool.
This includes twigs, leaves and other foreign materials.
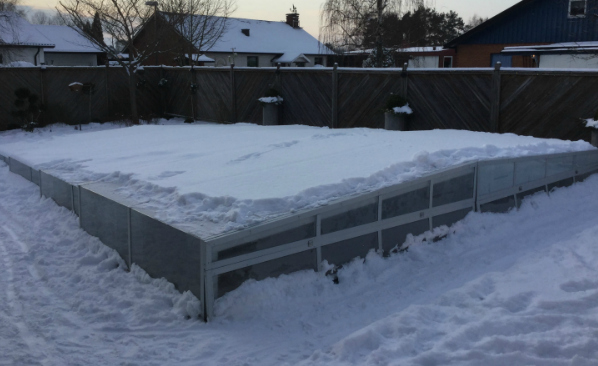
Protecting pool from snow
§ Adds some sense of style
A pool enclosure will add glamour to your pool and impress anyone wishing to enjoy a swimming session.
Pool enclosure adds style
Now, let’s start building our own pool enclosure.
The main questions you should ask yourself are:
Where do I begin?
Which materials should I use?
And,how should I install the pool enclosure?
Don’t worry, I will explain more.
Keep reading.
Let’s get to the first thing first.
Begin by Choosing Suitable Pool Enclosure Design
There are a variety of pool enclosure designs suited to your specifications.
In this chapter, I will take you through a detailed coverage on the different pool enclosure designs.
Also, I will explore different roofing designs.
There are several pool enclosure designs, but in this guide, I will majorly focus on the top popular designs that are currently used.
That is:
- High profile vs. Low profile pool enclosure
- Medium profile pool enclosure
- And, Retractable vs. Fixed pool enclosure
These are just a few.
Later in this guide I will give you more choices of other stylish swimming pool enclosure based on the roofing design.
Keep reading.
First, let’s start with:
Retractable vs. Fixed pool Enclosure
In case you want to build your own pool enclosure, you may consider these:
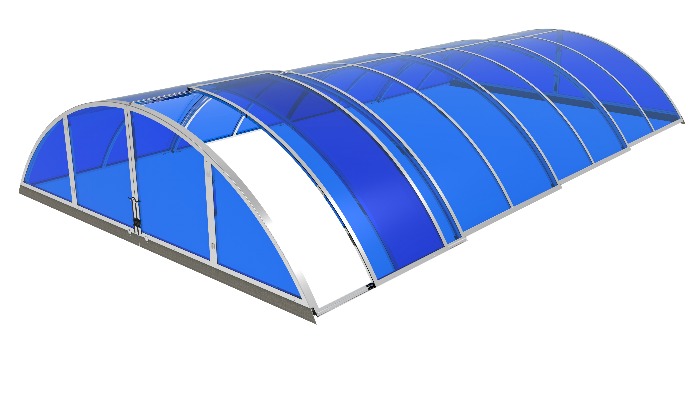
a) Retractable pool enclosure
A retractable pool enclosure is an adjustable swimming pool “cover” which protects it from harsh weather conditions.
Unlike a retractable pool enclosure, you cannot adjust a fixed pool enclosure to suit your preference.
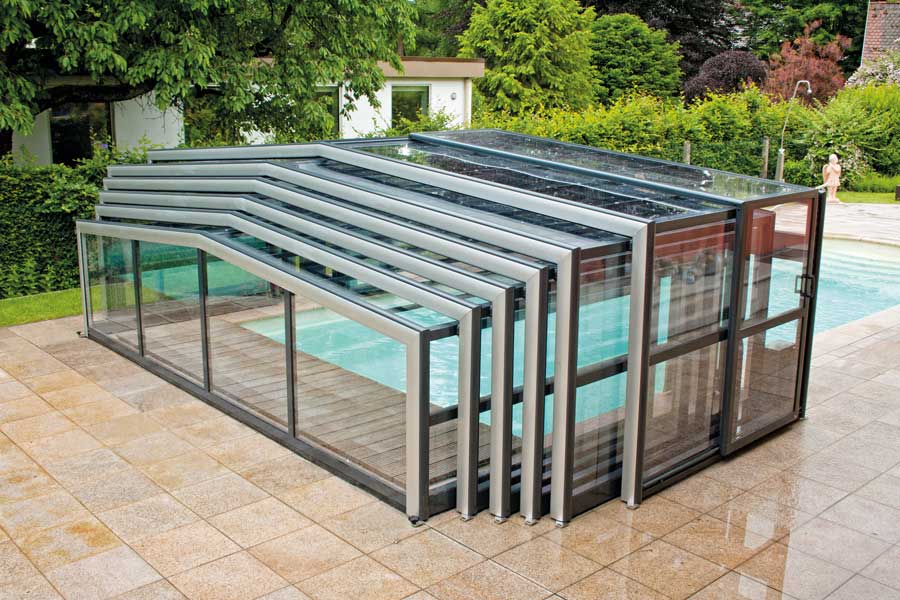
Retractable pool enclosure
This is what makes a retractable pool enclosure more beneficial.
I will explore more on the pros and cons of each one of them later in this guide.
For now, I am certain you can explain what a retractable pool is.
b) Fixed pool enclosure
We also have a fixed pool enclosure.
As the name suggests, it has no capability of being adjusted.
Section of fixed swimming pool enclosure
Its “shelter” or rather roof is stable, leaving you with minimal options.
This doesn’t mean that it is less attractive than a retractable pool enclosure.
Nevertheless, it has a couple of disadvantages that I will also expound more to you later in this guide.
High profile vs. Low Profile Pool Enclosure
Also, you may consider the height from the swimming pool water surface to the glazing material.
They are a perfect choice whenever you want to build your own pool enclosure too.
Here are some of the most common options:
a) High profile pool enclosure
As the name suggests, a high profile pool enclosure’s height is much higher above the pool.
This alternatively makes it the most expensive.
Why?
It will require more materials and manpower to build it.
High profile pool enclosure
Next we have the:
b) Low profile enclosure
A low profile pool enclosure has a low height above the pool.
Meaning, it will require less materials to construct, making it the cheapest design.
Unfortunately, it makes it impossible for you to stand on the pool deck while the roof is closed.
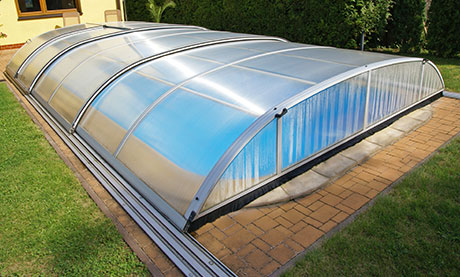
Low profile pool enclosure
One thing you need to know is that you can either open it manually or automatically.
Please note,you should ensure that the ventilation is open for air circulation.
c) Medium profile pool enclosure
This particular pool enclosure is neither high nor low above the pool.
You can walk around the pool comfortably without bending or any strain.
 Medium profile pool enclosure
As compared to the high profile pool enclosure, this particular pool enclosure consumes fewer materials.
How?
As I explained earlier in this guide, the higher the roof, the more materials needed for construction which in turn raises the cost.
I hope this has clarified how size, materials and cost are interrelated when choosing a suitable pool enclosure design.
Therefore, you can either choose a high, medium or low pool enclosure depending on your height preference.
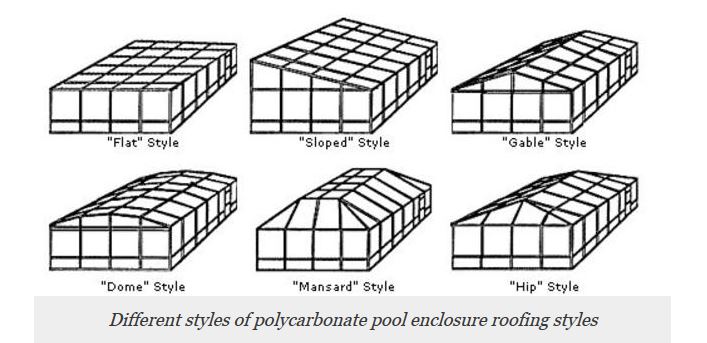
Roofing Designs of Swimming Pool Enclosure
Remember,I promised to mention more about swimming pool enclosure.
Well, in this section, I am going to introduce to you more pool enclosures based on different roofing designs.
The swimming pool enclosures are not limited to:
- Mansard roof style
- Dome roof style
- Gable roof style
- Slope roof style
- Flat roof style
- Hip roof style
a) Flat roof style
As the name suggests, it has a flat roof surface.
Aside that, it lays low above the pool and otherwise can be classified as a low profile pool enclosure.
They are built using solid polycarbonate sheet coupled with aluminum.
However, most people don’t prefer this type of design.
I wouldn’t recommend it either simply because of some reasons that I am about to inform you.
Advantages of flat roof style
- It warms pool water faster.
- Saves on heating cost due to its low lying roof.
- Protects the pool from debris and other foreign materials.
Disadvantages of flat roof style
- Its flat design prevents water drainage.By this I mean, water that accumulates on the surface has no outlet.
- Unappealing – Most people dislike it because of its shape or rather design.
- Debris does not slide off the surface which might destroy the roof.
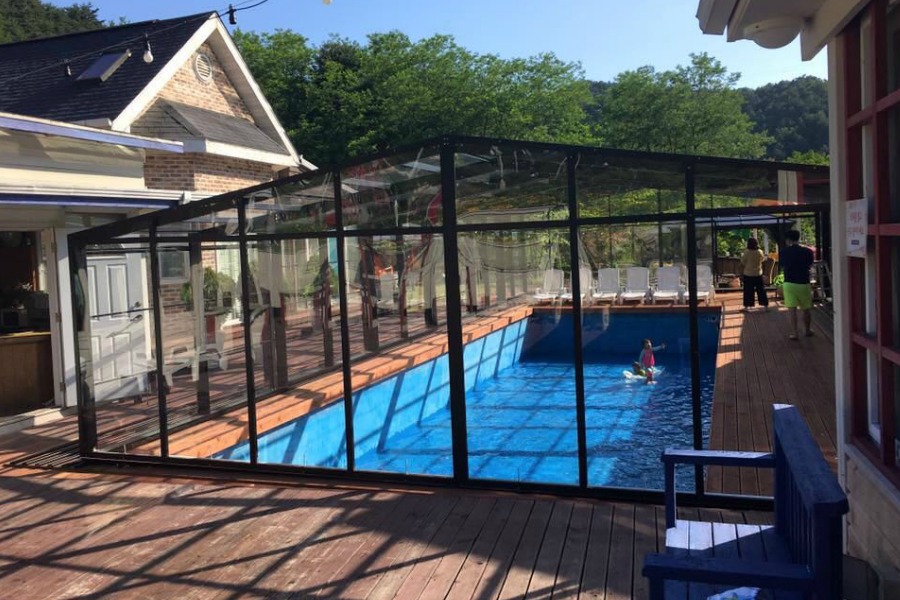
b) Slope roof style
The pool enclosure slopes to one side.
It is normally used on outdoor pools near the house.
How?
Most people attach it to the main house such that the higher side is fixed against the walls of the house.
It slants towards the pool enclosure wall from the house.
Advantages
- The sloppy design allows for water to drain off the surface easily.
- Saves on heating costs.
- Prevent foreign materials from entering into the pool.
Disadvantages
- Pool water gets colder- This comes as a result of the shade that the house generates.
c) Gable roof style
It’s otherwise known as A-frame roof.
Just like the letter A, its roof comprises of two sloping slides that join at the top .
What makes this design popular is its appearance that resembles most homes.
Again, it has a higher roof, thus classified as a high profile swimming pool enclosure.
Advantages
- Prevents foreign materials from entering the pool.
- The sloppy surface allows for accumulated water to slide off the surface easily.
Disadvantages
- Requires a lot of materials to construct as compared to a flat slope roof.
- It’s more expensive to build due to increased manpower.
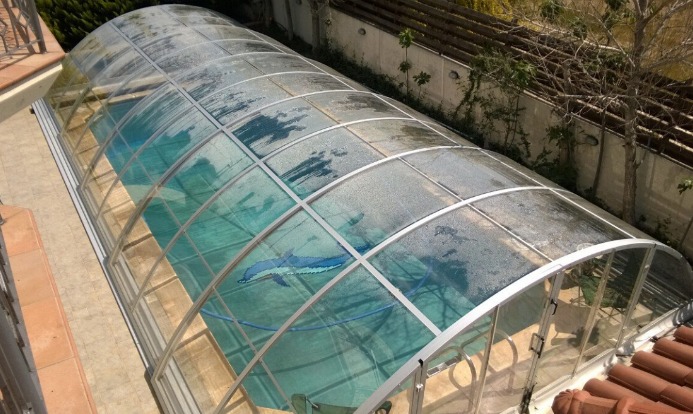
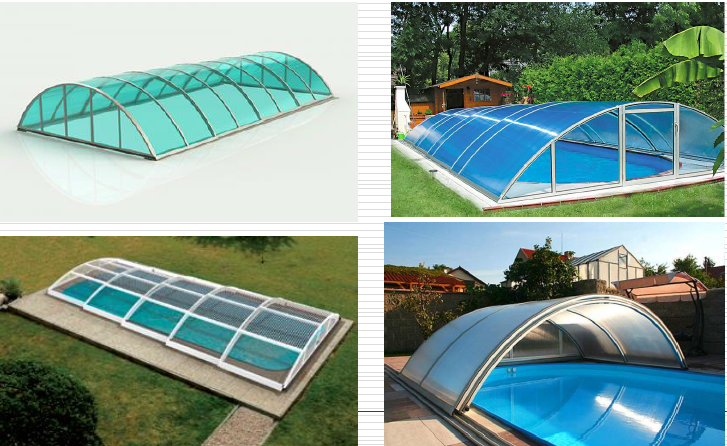
d) Dome roof style
This roof design takes a semi-circular shape.
It is one of the popular roof designs as it can either suite a medium to high profile swimming pool enclosure.
However, this is not the only reason for its popularity.
You also need to know that it is expansive enough to accommodate furniture not limited to chairs and tables.
Again, its semi-circular design facilitates sliding off of accumulated water or other foreign materials from the surface to the pool deck.
All these advantages render it one of the best roof designs.
Nevertheless, it is disadvantageous at some point.
Lets’ go straight to the cons.
Disadvantages
- Uses more materials as compared to a flat roof design.
- It’s more expensive to build as compared to other designs such as the flat roof design.
e) Mansard roof style
This roof style is not only classy though, spacious but also expensive.
Basically, this roof style comprises of four trapezoidal sloppy slides that meet a flat surface at the top.
The truth is that it comprises of two roof designs:
- Flat style– The upper flat surface portrays the flat roof style.
- Gable style– The two slanting slides depict the gable style.
Advantages
- It’s spacious
- It has an attractive appearance with its uniqueness.
- They can be integrated into a variety of architectural structures.
Disadvantages
- The flat surface above may accumulate dirt or snow, which might end up destroying the wall.
- It is expensive to build.
f) Hip roof style
A hip roof style is more or less similar to the gable roof design.
Unlike the gable roof design, this particular style slopes on the entire sides and converge at the peak.
What am trying to say is, its sides have a slanting effect as compared to gable roof design which has a flat surface from the top to the pool deck.
Take a look at this pool design and compare the two.
Advantages
- It is more wind resistant due to the slopes
- They are spacious.
- Allows debris to slide off the surface.
Disadvantages
- They are expensive to build.
- Difficult to design, thus requiring the need of a professional.
Now, here is a summary of pool enclosure roof designs:
At this stage, you should be in a position to choose a suitable pool enclosure.
But still, if you find it challenging, I will make everything simple for you.
In my next section I will show you the next step you should take when building your own pool enclosure.
After choosing your suitable pool enclosure design;
Now Choose Suitable Material for Pool Enclosure
Choosing a suitable material is critical when building a swimming pool enclosure.
Why?
Because it determines whether the pool enclosure will withstand snow weight and wind speed.
I will be honest with you here.
Anytime you want to build your own pool enclosure, you should consider:
Extruded Aluminum
The structural component of a swimming pool enclosure is ultimately the segment that supports the glazing material.
Normally, extruded aluminum pool structures are known to last as well as offer reliability.
What facilitates this?
Aluminum has physical and chemical elements which enhance durability.
And, that’s not all: Aluminum has several advantages that I will explain later in this section.
Extruded aluminum
I will recommend you to use extruded Aluminum for your pool enclosure.
But first, let’s know what a glazing material is.
Aglazing material is a section of a window or door constructed using glass.
In our case, it is the glass material that covers the pool.
Advantages
- Strength- It supports heavy loads.
- Safety- First Aluminum is non-toxic, making it children friendly.
- Durable- It can last more years as they are strong and durable.
- They are easy to maintain and reliable too.
Solid Polycarbonate Sheet
Solid polycarbonate sheet is the best that you can use.
That doesn’t mean that hollow polycarbonate sheet can’t serve the purpose, no. But have a look at this;
Solid polycarbonate sheet is much stronger, making it resistant to harsh weather conditions such as tornado and hurricanes.

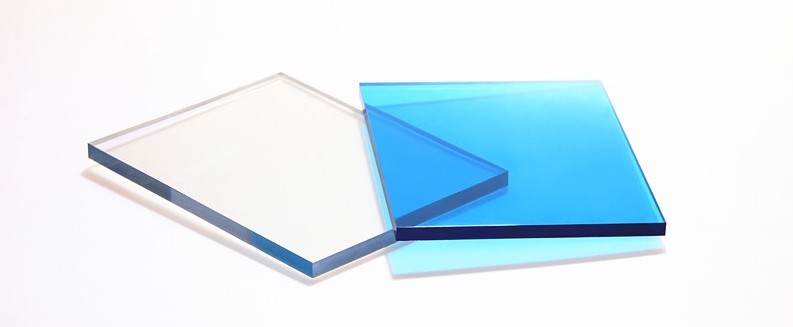
Solid polycarbonate sheet
Let me expound more on why you should choose a solid polycarbonate.
Advantages
- Filters harmful radiations causing sunburns.
- Reduces energy costs by minimizing heat loss.
- Last longer up to more than a decade.
- They are easy to fabricate.
Now, l will show you the final step in building your pool enclosure.
That is:
How to Build Install the Pool enclosure
Having outlined different designs of pool enclosures,installing them may require different methods according to their designs.
It seems difficult, right?
Not anymore, I’m here to show you a general method that you can apply in installing your pool enclosure.
It is such a simple process that may take no longer than one week.
That is, from the start, to the final stage.
Installing pool enclosure
Take for instance, a high profile pool enclosure and a medium profile one.
They have different designs, rail system and profiles.
I hope you remember what I said earlier.
This is the reason I will use them as illustrations for the pool enclosure installation.
Step 1: Assemble and Identify Parts of the Pool Enclosure
You will need to join the different parts as they don’t come attached.
However, this has been made easier by manufactures.
They label the components with their correct measurements and quantities that you will use when assembling them.
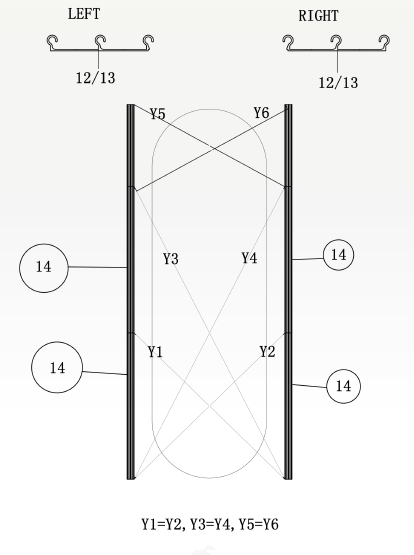
Let me go straight to the datasheet that will help you identify and sort out the parts.
This is exactly what it looks like.
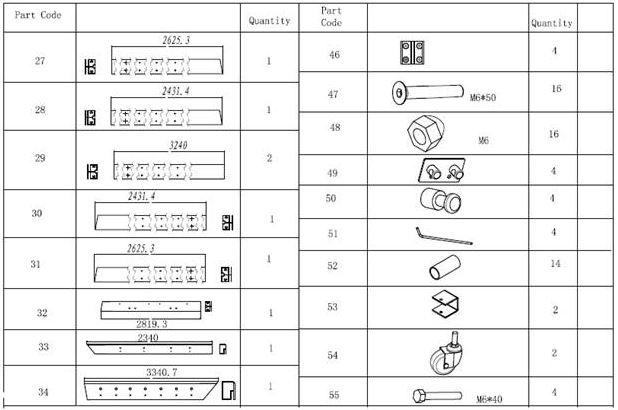
Parts of pool enclosure
Remember, the size and design of the swimming pool will determine the quantity of equipment needed.
Before installation, carefully study the nuts, bolts and screws so that you can decide on the fastening equipment to use.
Make sure to read the entire manual before any other activity.
Step 2: Rail Installation
This is where the actual installation begins.
Whether you have an irregular pool or a regular one, a retractable pool enclosure can successfully be installed.
How will this be achieved?
I will explain about this later, keep reading.
First, you will have to position your pool enclosure.
This should come after marking around the swimming pool so as to know where you to place it.
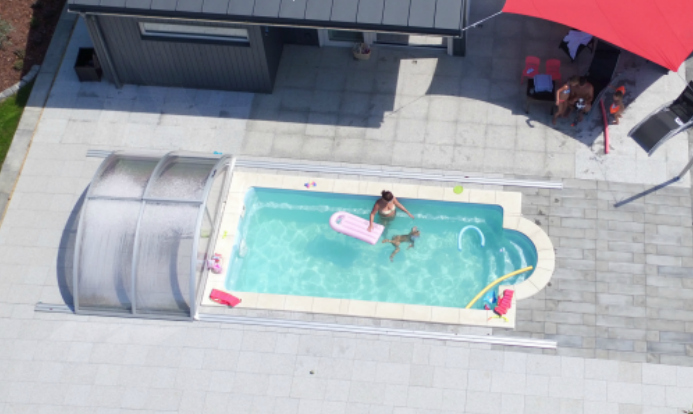
Then, spot the longest and shortest sides.
The reason being, the edges of the pool enclosure will lie on the long sides.
This will otherwise facilitate easy opening and closing of the covers.
That is: Pushing from the short side to the longest,opens the pool enclosure and vice versa.
This is what am talking about.

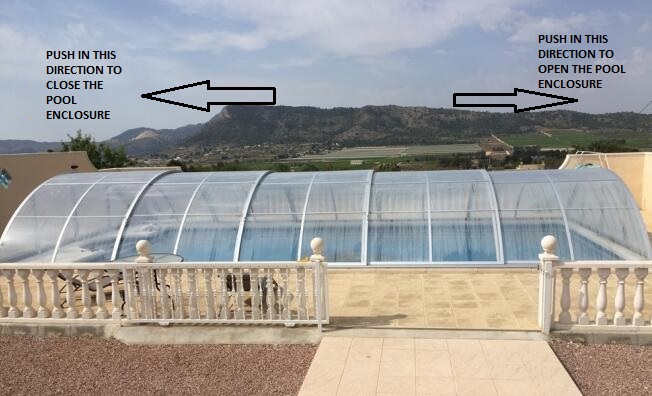
Opening and closing pool enclosure
The rail system will therefore be installed on the two longest sides parallel to each other.
Back to my previous question, how can you fit the pool enclosure system in irregular pools?
Have a look at the images below;
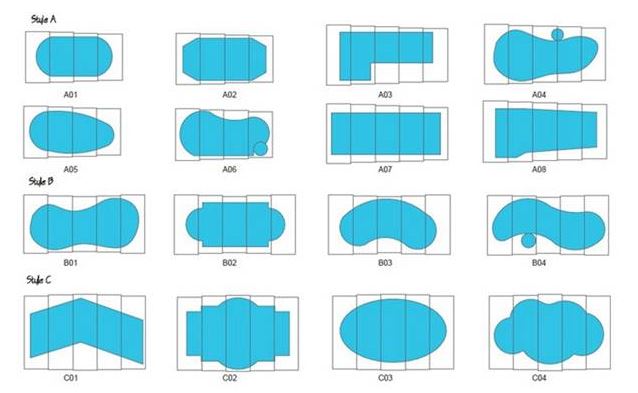
Different shapes of swimming pool
The blue section represents the pool while the lines are distinct parts of the panels ina retractable pool enclosure.
In addition, you can see that the shape of the pool will not restrict installation of a pool enclosure.
When marking the position where you will install the pool enclosure, it should be outside the pool.
Meaning, pools with different shapes can also have swimming pool enclosures.
Here is a simple layout:
Layout of pool enclosure
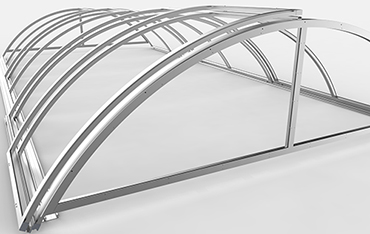
Step 3: Assemble the Pool Enclosure Structure
Remember the polycarbonate sheet and extruded Aluminum?
Well, this is the section where I will show you how to install them.
First, you start by joining the frames of the pool cover, in our case it’s the extruded Aluminum metal.
However, the two different pool enclosure designs will take different procedures due to their design.
Follow instructions in the manual.
As you continue joining more and more parts, a meaningful structure eventually forms.
This is what am talking about.
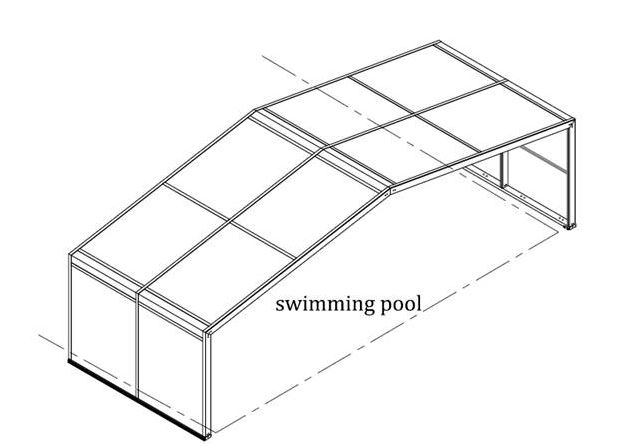
High profile pool enclosure
Low profile pool enclosure
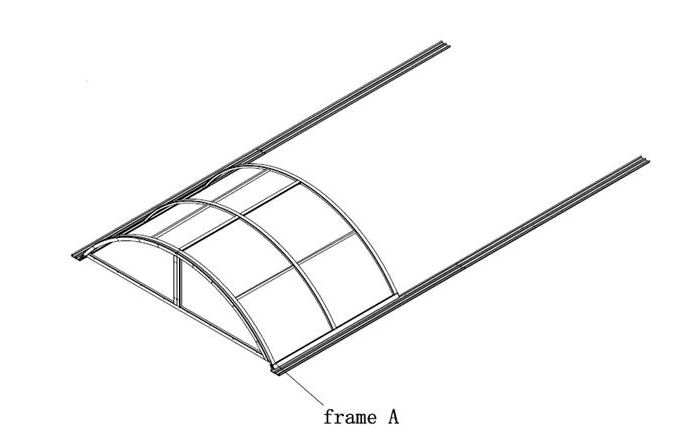
Make sure to start with the smallest pool enclosure panel in that order until you assemble the largest.
The reason being, the smallest pool enclosure is the one that you will install at the furthest end of the pool.
Handle the equipment with care. Mostly, there are no extra ones packed.
I would advise you to hire a professional if you aren’t skilled in the pole enclosure installation.
After making sure all covers can open and close and if there are wheels, they are moving freely, you can now be sure you are almost done.
Step 4: Install the Door for Your Pool Enclosure
It’s a must for every swimming pool enclosure to have an entrance.
This not only assures you of proper security, but also guarantees privacy.
Having accomplished most of the work, this process remains the simplest.
You will be required to fix a few components and finally your pool enclosure will be ready.
Sounds easy, right?
For instance, we have:
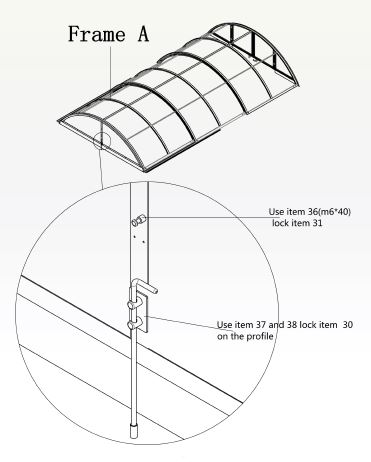
Locking mechanism
In this particular design, you will install your door to the first frame before Frame A.
The circled part clearly shows where you will install the locking mechanism.
On the other hand,we have this:
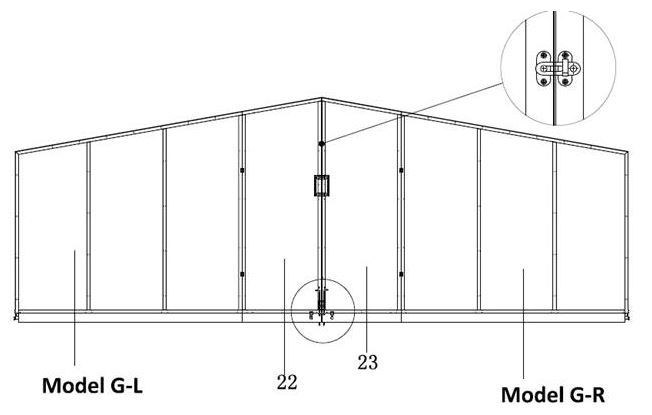
Locking mechanism for high profile enclosure
From the diagram above, we can see that both locking mechanisms are more or less the same.
For each case, you just have to follow the instructions stated in the manual carefully.
Once you are done with this step, everything is done.
You finally have your pool enclosure!
Fully assembled pool enclosure
Conclusion
You can now agree with me that building your own pool enclosure is such a simple process.
With all these, you can now go ahead and build your own pool enclosure with no difficulties.
Additionally, make proper use of the manual to the end.
Remember, a pool enclosure will extend your swimming season, reduce costs and add value to the property.
In case you want to learn more about pool enclosure, feel free to contact us.
And by the way, here are more resources you can learn more about building swimming pool enclosures: